Sunday, February 20, 2011

Struggling to Remember Passwords, Boomers? Try a Password Manager.

Recently, I've been struggling with passwords.I don't know if my inability to remember all my passwords is due to age, or if everyone is afflicted by it. Nevertheless, every time I go to a new website, it wants me to set up a new user name and password. It is very tempting to use the same password for everything, but all the security experts say that's wrong, that this practice leaves your data vulnerable to hackers and leads to identity theft.

Yet when I try to vary things, I find myself unable to remember which variation I chose for which website. That wouldn't be so bad, but many websites lock you out after a given number of tries, which is really frustrating to me. As many of you do, I chose to keep a list. Of course keeping a list of passwords on your computer is about as dumb as using the same password for everything. For a while I thought I was outsmarting the hackers by keeping the list in a file labeled "info for eye doctor." I've learned, however, that hackers can find those kinds of files pretty easily.

My next step was to rename the file, take it off my computer, and put in in the "Dropbox", the secure "container" for documents and photos that resides somewhere in the cloud. I wrote about Dropbox recently. Still, that didn't solve my problem. Whenever I needed a password I had to open Dropbox (which has its own password) and search through my list to find the right one.

Last week, I read an article about Google that made me think twice about my password practices. In an attempt to make Gmail and Google cloud applications like Google Documents  more secure, Google is offering its users the option of a 2-step verification process so they can log into their sites more securely. The concept of 2-step verification isn't new. Some banks and other very secure sites have offered this in the past. I'd never taken anyone up on their offer to use this process to protect anything though. It just seemed too difficult to me.

With 2-step verification, a unique password is generated by the site you are trying to enter and sent to your cell phone or to some other place like your email account. (You set all this up ahead of time.) You look up this password on your email or text message and enter it in the Google site to provide that extra level of security. Luckily, you only have to do this once a month, although if you are paranoid about hackers you can do it every day. Nevertheless, it seems pretty inconvenient to me. If you want to try this, log into Google,  go to My Account, then Settings, and then Google Account Settings.

Afterwards, you can go to this screen:

Once you select "Using 2-step verification" you'll be taken to this screen:


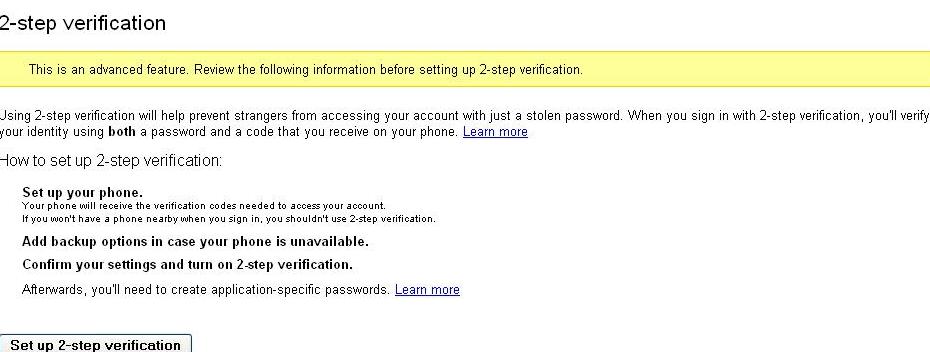
The process is easy to follow after that, but I decided it was too much for me. Besides, this would only protect my Google information. I would wind up having to implement 2-step authentication for all websites that offer it, especially those that contain personal or important information, such as my banking application. That just sounded like too much work.

For the past few years, I'd been hearing about free "Password Managers" which encrypt your passwords and auto fill them in for you when you need them. It took me a long time to want to try this. I thought it would be difficult to set up this kind of program and I worried about what would happen if something happened to the password manager company. One of my tech-savvy children was using a password manager, but two of them were not. It was time to give the program a try.
For no particular reason I decided to try out LastPass, a password manager that has been given some high marks by CNET. I think I've mentioned CNET before as a trusted source of product reviews. There are plenty of other password managers out there to try, for sure.  I went to the LastPass website and downloaded the program.

I don't think that software developers really know the fears that people have when trying something brand new to them, especially something that says it will keep you safer. I had all kinds of questions about the password manager that were not answered by all of my researching. I wanted to know, for example, if I would have to add each and every password manually to the manager (no!), how it would handle sites that I couldn't remember the passwords to (it offers me alternatives), what would happen to the passwords currently stored on my computer (they are encrypted), and if I could entrust the company with my passwords. (Since you are not doing anything permanent and can still enter passwords manually, you won't loose your data. And this company says only encrypted data is sent to them, so you don't have to worry about them being hacked.) Until I actually tried out the password manager, I didn't know the answers to any of these questions.

After I downloaded LastPass, I went to my download manager in the Firefox browser, found the file and clicked on it to install it. Here is the page that you use to set up the password manager:
Notice that you have to set up a sort of "super password" to get into your LastPass account. This has to be something you will remember, but it also has to be strong enough and long enough that you will trust this password to hold the key to all your other passwords. I figured out what mine would be, checked off the terms and conditions and licenses box, and held my breath as my encrypted information was sent to LastPass.

What happened next was interesting. LastPass, created a list of all sites and passwords taken from my computer, and collected it in its Vault.  After I logged on to their website using their master password,  I could actually see what my passwords were. I had the option to have LastPass hide them, which I took advantage of. This is the way the Vault looks to me now, without the passwords visible:


The list included some old passwords that had been changed and some passwords that I had tried erroneously. All of these would be stored. In addition, the site created an Icon on the top of the sign in pages on my accounts such as my banking account, Google, and the Wall Street Journal. This is what the Icon looks like on my Google page:

As long as I remember my super password, or as LastPass calls it, my master password, I have access to my vault on the LastPass website. I also set up a security question so I could retrieve that master password, if a senior moment gets to me.

There are always some glitches along the way of adopting a new technology. Recently I went to one of my banks' websites, and found that LastPass didn't have that password in its vault. I wound up having to reset the password at the bank, but now LastPass has it, and I should be able to enter the site without a problem.  For the most part, I've found using this program a great convenience and a great relief. Once again, I want to say that there are many other password managers that work similarly to LastPass, and you should feel free to try them. Just check out their reviews on a site like CNET before you do.

Also, I just want to mention that many of these Password managers charge extra for managing your passwords that are on your mobile phone or iPad, and that there are other password managers out there that  are designed especially for mobile devices, not PCs.

Here is a list of resources about password managers:

Top Ten Reviews
Best Password Managers: Top 4 Reviewed
5 password managers for storing, protecting and syncing your personal information


Wednesday, February 16, 2011

Alternative Way to Remove GPS Info From Photos on the Web

This is just a short update to my previous post about photos updated to the web that carry GPS information with them.

Besides being able to block that information from being collected by your phone or camera, the site Lifehacker presents ways to remove the data from your pictures, once they've already been uploaded to the web.

So if you've already posted a lot of pictures on Facebook, and you don't want the geo information to be associated with the pictures, follow the directions contained in this Lifehacker article: How Can I Remove Personal Info (Like Location) From Photographs by Whitson Gordon.  The instructions for removing the offending information for Windows are very simple. Thank you to my daughter for bringing this article to my attention.

Monday, February 7, 2011

Boomers: Your Photos May Disclose More Data than You Think

Recently, an ABC news video has been making the Internet rounds, exposing the fact that newer cameras and phones equipped with GPS chips are embedding location information into photos. This makes it easy for stalkers to find the addresses of the people who posted the photos. A lot of people are worried about this; I received the clip from three people in two days.

The iPhone, for example, automatically embeds the user's latitude and longitude in the "metadata" attached to each photo. If you don't want to be found for some reason, this could be dangerous. I can think of a few obvious examples: a battered woman who has left her spouse; a celebrity who wants to preserve some moments away from the paparazzi; a public official who doesn't want his "niece" found; the CEO of a financial organization that has lost its depositors' money who doesn't want journalists to find his home.

This ABC online story tells the tale of two researchers at the International Computer Science Institute in Berkeley, California who were able to find the private home addresses of a Playboy Playmate and some TV hosts. It was relatively easy to do.

It's always been relatively easy for a motivated individual to find your home address, even before these days of online look-up systems. You could just look in the White Pages. If the person was from out of your local area, you went over to the library and looked through the shelves of White Pages books stored there. Obviously, the White Pages had its limitations. In the past, if you didn't know where someone lived, you might have to go through a hundred telephone books to find them. In other words, you really needed to be motivated. And most people who didn't want to be found paid the telephone company for an unpublished listing.

However, it's now much easier, not to mention quicker, for unscrupulous people to find out where you live.  The New York Times notes that:
By downloading free browser plug-ins like the Exif Viewer for Firefox (addons.mozilla.org/en-US/firefox/addon/3905/) or Opanda IExif for Internet Explorer (opanda.com/en/iexif/), anyone can pinpoint the location where the photo was taken and create a Google map.
One article said that people who list items for sale on Craigslist could be setting themselves up for robbery, just by posting a picture of the item for sale on the website. Last year, I posted a photo, taken at my home, of an old TV I wanted to sell on Craigslist. I didn't give out my address; people contacted me through Craigslist's email address, and I only contacted people who were interested and whose identity I could verify.

The TV was purchased by someone who had a business in my local area, and I was able to confirm his identity online and match the phone number he gave me in the email with his place of business. But what if the picture of the TV had been taken by a phone that was GPS enabled and had included location metadata? Then any unscrupulous person could have known where I lived and what merchandise I had. Further, if I had shown the TV in a living area of my home, they would have been able to find out much more about me. This is very unsettling. So if you ever post pictures online --of your cute grandkids, your dog, the tons of snow in front of your house--you should think about the information you are sharing.

There are many good reasons to use GPS metadata in photos. It's very convenient, for example, to post pictures to services like Flikr which then "know" where the picture was taken and label it with the location. Pictures from your trip to Japan will have exact locations attached, which for someone who forgets to record that kind of info, is very helpful when organizing albums. If you post pictures from home, you are not at risk of disclosing your location if you choose to make your photos private (an option most photo sharing sites allow) and only share them with people you know. However, if you take a lot of pictures at home and make your albums public, then you should think about the risks associated with letting everyone who has access to the site know your location.

Prompted by one of the articles I read on this subject, I visited a website called I Can Stalk You, which bills itself as "raising awareness about inadvertent information sharing." This site has hints on how to turn off GPS tracking for photos on the iPhone. Here is what I Can Stalk You has to say about turning off the GPS location information on the iPhone 4:

To see your settings, go to Settings, General, then Location Services. From there you can set which applications can access your GPS coordinates or disable it entirely.
For the iPhone 3 series of phones, users have to jump through some hoops. iPhone series 3 users can turn off ALL location based services by going to Settings, General then set Location Services to Off.  While this is simple, I don't recommend doing this. You will never be able to use Google Earth, for example, or driving direction features that use your present location.

So if you want to turn off location data for the camera on the iPhone 3 series, this is what you'll need to do: Go to Settings, General, then Reset.  The rest of the instructions are borrowed from this page on  the website I Can Stalk You, which I strongly suggest you visit.
Be careful here! We want to select Reset Location Warnings, and then Reset Warnings. This restores all of our Location based warnings for each application to the default, which in most cases is "Ask on first use".


From here, once we enter into the default Camera app on the iPhone, we can select Don't Allow. This will prevent the Camera app from geo-tagging our photos.

Not everyone has an iPhone, and I Can Stalk You has some directions for Blackberry users and some others. Since every manufacturer has different instructions, it may take some digging for you to figure out how to disable your information on your newer camera or on your smartphone, if you choose to do so.

In this day and age it's not only technology that reveals your location, but sometimes your friends want to tag the location that a picture was taken on Facebook. ABC News provides the following information on how to protect your Facebook photos from friends who might want to disclose your location to others.
  •  Go to your Facebook account.
  •  Click "Account" in the top right corner.
  •  Click "Privacy Settings.".
  •  In the "Sharing on Facebook" section, click "Customize settings."
  •  Scroll down to "Things others share" and make the option next to "Friends can check me into Places" read "Disabled."
So fellow Boomers, enjoy taking and posting pictures. I know you do it. I've seen those pictures of your grandkids! Tell your children about this too, and make them a little bit more aware of what data is hidden in those pictures they take and share.